Showing posts with label Techniques. Show all posts

Sunday, December 29, 2013

Linen Stitch Short-Row Heel, First Try

For Jim's Eagles socks, I thought I'd try working a linen stitch heel to match its linen stitch toe.

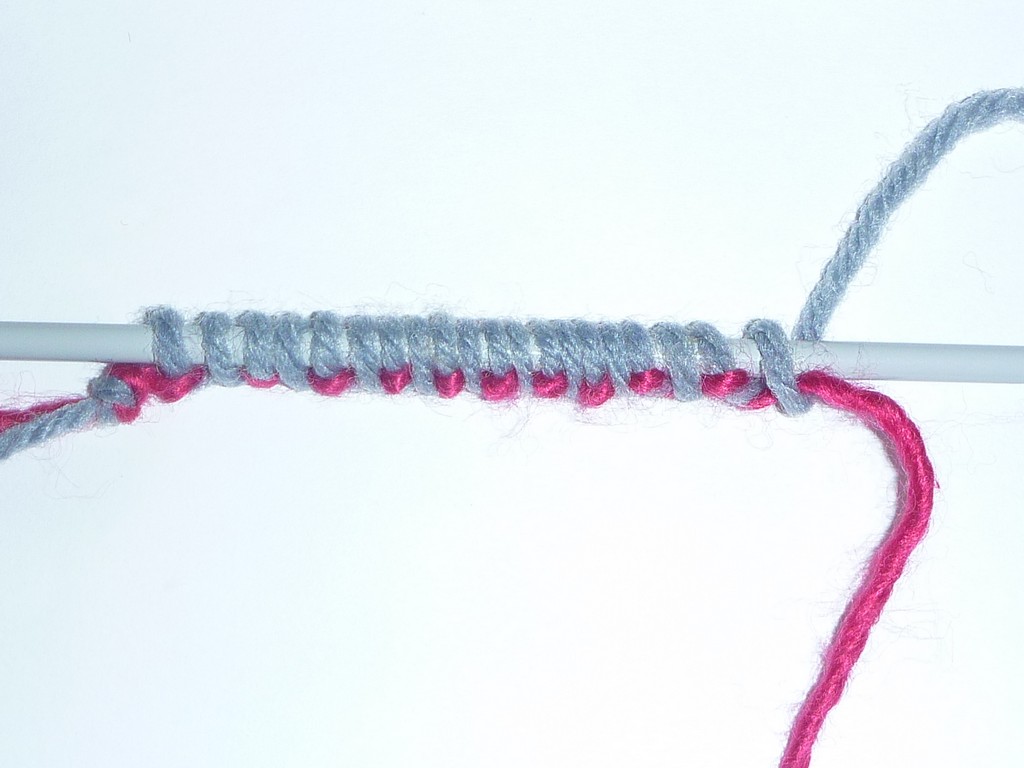
After mulling over the heel methods I know, I decided to try a short-row heel in linen stitch. I thought the first half went fairly well. I completed my arch expansion, switched to my black yarn and knit around to my end-of-round marker. (Due to the jogless joins at each color change, the marker had migrated around to almost the center of the sole.) Then, I started with the linen stitch - RS: k1, slip 1 with yarn in front; WS: p1, slip 1 with yarn in back; being sure to work the stitch that was slipped on the previous row and slip the stitch that was worked on the previous row.

The first half was:

Sunday, October 14, 2012

Shoal Bay Slouch - Part 1, Preparation

Now that fall has arrived and since I Still Need a Hat, I decided to peruse my stash. I played with a couple choices and eventually settled on this:
The yarn is somewhat thick-and-thin and has a fine strand in tan that's twisted together with a much thicker variegated strand. I have 4 skeins - 2 with lighter toned variegated yarn and 2 with darker toned variegated yarn - and I have no idea where or when I may have acquired this yarn.

Reading the label, the yarn is called "Montreux", it's 77% wool and 23% acrylic and it's made by Southern Cross Yarns. The skeins are 50 g (81.5 m), recommended needle size is 5.50 mm with a gauge of 16 st = 10 cm. (5.50 mm = US 9. 10 cm ≈ 4 in.)
Since I'm planning to make a hat, I'll need double-pointed needles and 16-in circular needles. Yeah, if I need to, I can make this work with a pair of circulars instead of the DPs and the 16-inch circs, but using 2 circs to knit round isn't my preferred method ... yet. (I've changed my mind on things like this in the past and fully expect to do it again.) I have DPs and 16-inch circs in size 6 (4.25 mm), so that's where I'll start my swatching.

I played with a few pattern stitches, but soon decided to let the yarn be the focus. I tried a welt stitch in the darker yarn - to give it a bit of texture ...

Sunday, March 25, 2012

How Painting is Like Knitting (aka Kitchen Update - Part 4)

[Another re-dated post that was originally written in June.]

House painting that is. You might think it's a bit of a stretch, but it occurred to me a couple months ago while I was doing some painting at our new house.

As mentioned in my previous Kitchen Update posts (Part 1, Part 2 and Part 3), the new house didn't have a spot for our washer/dryer and we decided to create one. Bill tore out about half the kitchen, made plumbing and electrical changes and put the wall back together. Right about then, it was time for Bill to go to BC with his buddy Craig and move Craig's new boat down from BC to Lopez.

And it was time for me to paint.

Before you actually paint, you need to lay down drop cloths ...
tape off/cover anything at risk for getting paint on it ...

Friday, December 9, 2011

I Need a Hat - The Cross Stitch, version 2

In my previous post, I showed the method I've been using for the 1-over-2 left cross from my first "I Need a Hat" post. (I think I'm going to call this hat "Moss & Cross".) It's a cabling-without-a-cable-needle method that is quick and easy, but does involve leaving a stitch "hanging out", completely unsecured while you work 2 other stitches.

The following is an alternate method for cabling-without-a-needle.

Here we are at round 5 again. (The first stitch on the left needle has been slipped in each of the previous 2 rounds.)

Begin by slipping the next 3 stitches from the left needle to the right needle. One ...
Two ...
Three ...

Wednesday, December 7, 2011

I Need a Hat - The Cross Stitch

In working the "cross" portion of the pattern stitch I'm using for this hat (described in my first "I Need a Hat" post), I've been doing the cross without a cable needle. So, I thought I'd take some photos of the technique I'm using.

Here we are in round 5 of the pattern. (Having worked slip 1, knit 2 in rounds 3 and 4.)
The first stitch on the left needle is the slip stitch - the stitch that will be crossed over the next 2 stitches on the left needle. What I do is drop the slip stitch off the needle, then knit the next 2 stitches, then pick up the dropped stitch and knit it.

Yep, I just leave that first stitch hanging out in front of the work, completely unsecured by a needle. Since it was slipped in the previous 2 rounds, it isn't directly connected to the other stitches in this round and therefore, it's much less likely to work it's way out while you're working the other stitches. It helps that in this pattern, the stitch only has to "hang out" while you work 2 stitches and then it's picked up and all secure again. Finally, the yarn itself is a little "sticky" and that helps as well.

So, here we go.

I usually just slip the stitch off the needle, but if you want to give yourself a bit of extra insurance you can use the right needle to give the stitch a little tug.

Wednesday, November 30, 2011

Hat for Bill - part 2

Having knit the hat one time in it's entirety and then ripped it all out (see my previous post), I started up again. This time, I went with the 1-1½-inch negative ease, I knit the entire lining in stockinette stitch ... and I remembered to take a couple "in progress" photos.

I modified the process just a little by leaving the provisional yarn at the bottom of the lining and picking up the main yarn there. So the revised process was:
  1. Provisional cast on using lining yarn and work about an inch. 
  2. Pick up stitches at provisional cast on. Using main main yarn, work a couple rounds, then work a turning round and work back up to even with lining "fabric".
  3. Join the main "fabric" and the lining "fabric" together.
  4. Work the rest of the lining and the rest of the main hat separately.
  5. Tack the pieces together at the top.

Monday, September 5, 2011

Tubular Bind-Off for 1x1 Ribbing

Now that I've completed all that sampling of Cast-Ons for 1x1 ribbing, what about Bind-Offs? This is actually much simpler. A number of years ago I learned Tubular Bind-Off for 1x1 Ribbing and it is without question my favorite.

Arguably, it was my satisfaction with this Bind-Off that got me started experimenting with Cast-Ons. I was sure there had to be a Cast-On of equal magnificence to this delightful bound off edge ...


The method I use for Tubular Bind-Off for 1x1 Ribbing is described in Hand Knitting Techniques from Threads. I tracked down online versions here and here. Neither of these are exactly the same as the process I use so I'll describe it (and document it) below.

Wednesday, August 31, 2011

Cast-Ons for 1x1 Ribbing - Conclusions

After working up approximately 20 swatches of various cast-ons for 1x1 ribbing, what have I learned?

Lesson 1 - I should have done this a LONG time ago because ...

Lesson 2 - Tubular edges for 1x1 ribbing are magnificent!
The round (aka "tubular") edge achieved by working several rows of tubular 1x1 ribbing before moving on to standard 1x1 ribbing is just beautiful. My favorites are: Invisible Provisional, Version 1 (take 2); Tubular Cast-on, Version A; and Tubular Cast-on, Version B. (All described on my "Day 3" post.)

Lesson 3 - When thinking about using something other than a tubular edge, I will think again!

Lesson 4 - If I still think there's a good reason NOT to use a tubular edge, I would choose Alternate Cable Cast-On, Channel Islands Cast-On or Crochet Cast-On. (All described on my "Day 4" post.)

Lesson 5 - When considering my cast-on choice, I will remember that I am embarking on a hand-knit piece to which I will devote hours and hours of my time. The beginning warrants my finest effort.

Now for some additional details as well as a few photos ...

Monday, August 29, 2011

Experimenting with Cast-Ons - 1x1 Ribbing - Day 4

   • Long-tail Cast-On
   • Channel Islands Cast-On
   • Cable Cast-On
   • Alternate Cable Cast-On
   • Knitting On
   • Crochet Cast-On (in 2 versions)


Now, I'll try various non-tubular/round-edge cast ons and see what they look like with 1x1 ribbing.

It probably would have made more sense to start with these. However, my initial impetus for experimenting & documenting 1x1 cast-ons came when I was working with a tubular/round-edge cast on and it was only as I  was working through those that it occurred to me to document the non-tubular cast-ons as well.

Long-tail Cast-On

Because if I'm going to be complete, I need to include Long-tail. The 2 sides do look different. Here is a photo with the return row facing (tail is on the right and this is typically the "wrong" side).
Here is the other side facing (tail is on the left and this is typically the "right" side).

Friday, August 26, 2011

Experimenting with Cast-Ons - 1x1 Ribbing - Day 3

   • Tubular Cast-On, Version A
   • Tubular Cast-On, Version B
   • Invisible Cast-On

   • Invisible Provisional, Version 1 - Take 2

Next up are "tubular" cast-ons, another "invisible" cast-on and a do-over of a Day 1 "invisible" cast-on.

Tubular Cast-On, Version A

This cast-on is in two of my "go to" knitting books - Vogue Knitting and Hand-Knitting Techniques from Threads. An online version can be found here. You begin with a provisional yarn and cast on half the number of required stitches. Then, with the main color work k1, yo to the end of the row ending with k1 (which leaves you with an odd number of stitches on the needle). For the 1x1 ribbing, the yo becomes the purl stitch and the k1 is, of course, the knit stitch. After the k1, yo row you work 2 or 4 rows of tubular ribbing. If you need an even number of 1x1 ribbing stitches (pretty common in my experience), my instructions say to increase 1 st at the end of the 1st row. Once again, this would leave me with 1x1 ribbing that begins with a purl stitch instead of a knit stitch. Perhaps I just need to get over my "issue" about starting 1x1 ribbing with a purl stitch. On the other hand, maybe I could increase 1 at the beginning of the row instead of the end of the row. I'll give it a try and see what happens.

The Hand-Knitting Techniques from Threads instructions recommend beginning with a needle size 2 sizes smaller than the main needle size. I did that and here's the provisional cast on of half the number of stitches followed by 1 row with the main yarn (k1, yo ... ending with k1). Front side ...
and back side ...

Wednesday, August 24, 2011

Experimenting with Cast-Ons - 1x1 Ribbing - Day 2

   • Crochet Provisional
   • Japanese Crochet Provisional
   • Crochet Cast-On for Tubular Rib


I'm back at my 1x1 ribbing cast-ons and today looking at those that use crochet.

Crochet Provisional

I first encountered this in my trusty Vogue Knitting book (page 29) where it's called "Chain cast-on". The "Invisible Crochet Cast On I" (scroll down the page) is one of many online descriptions. In this method, stitches are essentially crocheted on over the knitting needle. I've used this method before as a regular cast-on (using the main yarn and beginning to knit after the cast on is complete), but I haven't ever used it for a provisional cast on.

Here are the stitches crocheted on to the knitting needle.
Then I worked 4 rows of tubular rib (k1, s1p wyif), followed by several rows of standard 1x1 ribbing. Here's what it looked like on the "front".

Monday, August 22, 2011

Experimenting with Cast-Ons - 1x1 Ribbing - Day 1

   • Invisible Provisional, Version 1
   • Invisible Provisional, Version 2
   • Italian Cast-On


I've tried lots of different cast ons and tend to lose track of what I like (and don't like) as soon as I've finished the cast on (or the project). So, I decided to work up various options, document what they look like and note my personal pros/cons.

My most recent project started with 1x1 ribbing, so that's where I'm starting. First up is ..

Invisible Provisional, version 1 (video can be found about 3/4 down on this page)

This one uses a provisional yarn knotted to the working yarn. The yarn is arranged much as it is for long-tail cast on but the working yarn is held over the  thumb and provisional yarn is held over the index finger.  Then a series of loops are created following an "in front, behind" ... "behind, behind" process. ("In front" of and "behind" the provisional yarn.)

When finished, I think the “in front, behind” loop looks like a knit stitch and the “behind, behind” loop looks like a purl stitch. So, after casting on an even number of stitches, when I turned everything around to begin knitting, I was all lined up for 1x1 tubular rib (k1, slip 1 purlwise with yarn in front).

Here it is all set to begin the tubular rib.