After working up approximately 20 swatches of various cast-ons for 1x1 ribbing, what have I learned?
Lesson 1 - I should have done this a LONG time ago because ...
Lesson 2 - Tubular edges for 1x1 ribbing are magnificent!
The round (aka "tubular") edge achieved by working several rows of tubular 1x1 ribbing before moving on to standard 1x1 ribbing is just beautiful. My favorites are: Invisible Provisional, Version 1 (take 2); Tubular Cast-on, Version A; and Tubular Cast-on, Version B. (All described on my "Day 3" post.)
Lesson 3 - When thinking about using something other than a tubular edge, I will think again!
Lesson 4 - If I still think there's a good reason NOT to use a tubular edge, I would choose Alternate Cable Cast-On, Channel Islands Cast-On or Crochet Cast-On. (All described on my "Day 4" post.)
Lesson 5 - When considering my cast-on choice, I will remember that I am embarking on a hand-knit piece to which I will devote hours and hours of my time. The beginning warrants my finest effort.
Now for some additional details as well as a few photos ...
Wednesday, August 31, 2011
Monday, August 29, 2011
Experimenting with Cast-Ons - 1x1 Ribbing - Day 4
• Long-tail Cast-On
• Channel Islands Cast-On
• Cable Cast-On
• Alternate Cable Cast-On
• Knitting On
• Crochet Cast-On (in 2 versions)
Now, I'll try various non-tubular/round-edge cast ons and see what they look like with 1x1 ribbing.
It probably would have made more sense to start with these. However, my initial impetus for experimenting & documenting 1x1 cast-ons came when I was working with a tubular/round-edge cast on and it was only as I was working through those that it occurred to me to document the non-tubular cast-ons as well.
Long-tail Cast-On
Because if I'm going to be complete, I need to include Long-tail. The 2 sides do look different. Here is a photo with the return row facing (tail is on the right and this is typically the "wrong" side).
 Here is the other side facing (tail is on the left and this is typically the "right" side).
• Channel Islands Cast-On
• Cable Cast-On
• Alternate Cable Cast-On
• Knitting On
• Crochet Cast-On (in 2 versions)
Now, I'll try various non-tubular/round-edge cast ons and see what they look like with 1x1 ribbing.
It probably would have made more sense to start with these. However, my initial impetus for experimenting & documenting 1x1 cast-ons came when I was working with a tubular/round-edge cast on and it was only as I was working through those that it occurred to me to document the non-tubular cast-ons as well.
Long-tail Cast-On
Because if I'm going to be complete, I need to include Long-tail. The 2 sides do look different. Here is a photo with the return row facing (tail is on the right and this is typically the "wrong" side).

Friday, August 26, 2011
Experimenting with Cast-Ons - 1x1 Ribbing - Day 3
• Tubular Cast-On, Version A
• Tubular Cast-On, Version B
• Invisible Cast-On
• Invisible Provisional, Version 1 - Take 2
Next up are "tubular" cast-ons, another "invisible" cast-on and a do-over of a Day 1 "invisible" cast-on.
Tubular Cast-On, Version A
This cast-on is in two of my "go to" knitting books - Vogue Knitting and Hand-Knitting Techniques from Threads. An online version can be found here. You begin with a provisional yarn and cast on half the number of required stitches. Then, with the main color work k1, yo to the end of the row ending with k1 (which leaves you with an odd number of stitches on the needle). For the 1x1 ribbing, the yo becomes the purl stitch and the k1 is, of course, the knit stitch. After the k1, yo row you work 2 or 4 rows of tubular ribbing. If you need an even number of 1x1 ribbing stitches (pretty common in my experience), my instructions say to increase 1 st at the end of the 1st row. Once again, this would leave me with 1x1 ribbing that begins with a purl stitch instead of a knit stitch. Perhaps I just need to get over my "issue" about starting 1x1 ribbing with a purl stitch. On the other hand, maybe I could increase 1 at the beginning of the row instead of the end of the row. I'll give it a try and see what happens.
The Hand-Knitting Techniques from Threads instructions recommend beginning with a needle size 2 sizes smaller than the main needle size. I did that and here's the provisional cast on of half the number of stitches followed by 1 row with the main yarn (k1, yo ... ending with k1). Front side ...
 and back side ...
• Tubular Cast-On, Version B
• Invisible Cast-On
• Invisible Provisional, Version 1 - Take 2
Next up are "tubular" cast-ons, another "invisible" cast-on and a do-over of a Day 1 "invisible" cast-on.
Tubular Cast-On, Version A
This cast-on is in two of my "go to" knitting books - Vogue Knitting and Hand-Knitting Techniques from Threads. An online version can be found here. You begin with a provisional yarn and cast on half the number of required stitches. Then, with the main color work k1, yo to the end of the row ending with k1 (which leaves you with an odd number of stitches on the needle). For the 1x1 ribbing, the yo becomes the purl stitch and the k1 is, of course, the knit stitch. After the k1, yo row you work 2 or 4 rows of tubular ribbing. If you need an even number of 1x1 ribbing stitches (pretty common in my experience), my instructions say to increase 1 st at the end of the 1st row. Once again, this would leave me with 1x1 ribbing that begins with a purl stitch instead of a knit stitch. Perhaps I just need to get over my "issue" about starting 1x1 ribbing with a purl stitch. On the other hand, maybe I could increase 1 at the beginning of the row instead of the end of the row. I'll give it a try and see what happens.
The Hand-Knitting Techniques from Threads instructions recommend beginning with a needle size 2 sizes smaller than the main needle size. I did that and here's the provisional cast on of half the number of stitches followed by 1 row with the main yarn (k1, yo ... ending with k1). Front side ...

Wednesday, August 24, 2011
Experimenting with Cast-Ons - 1x1 Ribbing - Day 2
• Crochet Provisional
• Japanese Crochet Provisional
• Crochet Cast-On for Tubular Rib
I'm back at my 1x1 ribbing cast-ons and today looking at those that use crochet.
Crochet Provisional
I first encountered this in my trusty Vogue Knitting book (page 29) where it's called "Chain cast-on". The "Invisible Crochet Cast On I" (scroll down the page) is one of many online descriptions. In this method, stitches are essentially crocheted on over the knitting needle. I've used this method before as a regular cast-on (using the main yarn and beginning to knit after the cast on is complete), but I haven't ever used it for a provisional cast on.
Here are the stitches crocheted on to the knitting needle.
 Then I worked 4 rows of tubular rib (k1, s1p wyif), followed by several rows of standard 1x1 ribbing. Here's what it looked like on the "front".
• Japanese Crochet Provisional
• Crochet Cast-On for Tubular Rib
I'm back at my 1x1 ribbing cast-ons and today looking at those that use crochet.
Crochet Provisional
I first encountered this in my trusty Vogue Knitting book (page 29) where it's called "Chain cast-on". The "Invisible Crochet Cast On I" (scroll down the page) is one of many online descriptions. In this method, stitches are essentially crocheted on over the knitting needle. I've used this method before as a regular cast-on (using the main yarn and beginning to knit after the cast on is complete), but I haven't ever used it for a provisional cast on.
Here are the stitches crocheted on to the knitting needle.

Monday, August 22, 2011
Experimenting with Cast-Ons - 1x1 Ribbing - Day 1
• Invisible Provisional, Version 1
• Invisible Provisional, Version 2
• Italian Cast-On
I've tried lots of different cast ons and tend to lose track of what I like (and don't like) as soon as I've finished the cast on (or the project). So, I decided to work up various options, document what they look like and note my personal pros/cons.
My most recent project started with 1x1 ribbing, so that's where I'm starting. First up is ..
Invisible Provisional, version 1 (video can be found about 3/4 down on this page)
This one uses a provisional yarn knotted to the working yarn. The yarn is arranged much as it is for long-tail cast on but the working yarn is held over the thumb and provisional yarn is held over the index finger. Then a series of loops are created following an "in front, behind" ... "behind, behind" process. ("In front" of and "behind" the provisional yarn.)
When finished, I think the “in front, behind” loop looks like a knit stitch and the “behind, behind” loop looks like a purl stitch. So, after casting on an even number of stitches, when I turned everything around to begin knitting, I was all lined up for 1x1 tubular rib (k1, slip 1 purlwise with yarn in front).
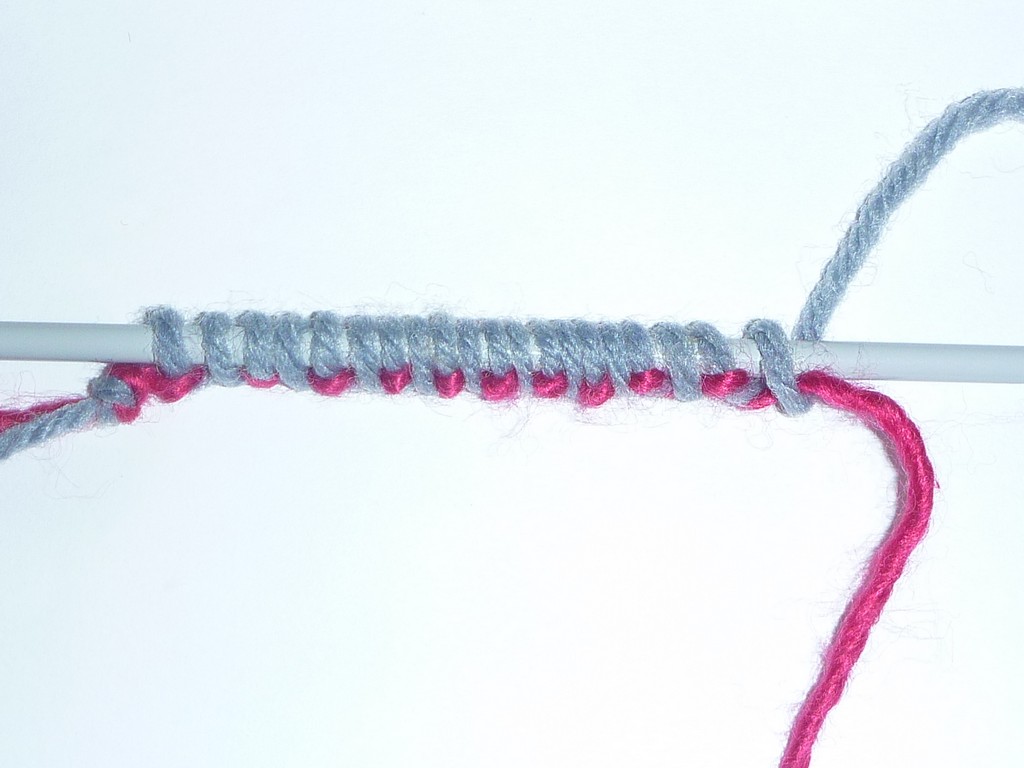
Here it is all set to begin the tubular rib.

• Invisible Provisional, Version 2
• Italian Cast-On
I've tried lots of different cast ons and tend to lose track of what I like (and don't like) as soon as I've finished the cast on (or the project). So, I decided to work up various options, document what they look like and note my personal pros/cons.
My most recent project started with 1x1 ribbing, so that's where I'm starting. First up is ..
Invisible Provisional, version 1 (video can be found about 3/4 down on this page)
This one uses a provisional yarn knotted to the working yarn. The yarn is arranged much as it is for long-tail cast on but the working yarn is held over the thumb and provisional yarn is held over the index finger. Then a series of loops are created following an "in front, behind" ... "behind, behind" process. ("In front" of and "behind" the provisional yarn.)
When finished, I think the “in front, behind” loop looks like a knit stitch and the “behind, behind” loop looks like a purl stitch. So, after casting on an even number of stitches, when I turned everything around to begin knitting, I was all lined up for 1x1 tubular rib (k1, slip 1 purlwise with yarn in front).
Here it is all set to begin the tubular rib.
Friday, August 19, 2011
Pesto
A few days ago, Bill and I picked up our first batch of basil (4 lbs) from Horse Drawn Farms and yesterday, I finished processing the last of it into pesto. In case you’re wondering, here’s what a 1 lb bag of basil looks like.

After picking the basil leaves, grating the cheese and peeling the garlic, the kitchen island “station” was all set for pesto processing.

After picking the basil leaves, grating the cheese and peeling the garlic, the kitchen island “station” was all set for pesto processing.
Thursday, August 18, 2011
Getting started
My husband Bill and my niece Catie have both suggested that I should start blogging and since they both know that I always do what I'm told ...
Given that Catie was a main catalyst for this endeavor, it seems appropriate that she's part of my first post. Plus, I have pictures of her wearing a pair of fingerless mitts that I knit last fall when she was staying with us on Lopez. (I did recently knit a pair of gloves for Bill, but I don't have any pictures yet.) So, Catie it is!

Given that Catie was a main catalyst for this endeavor, it seems appropriate that she's part of my first post. Plus, I have pictures of her wearing a pair of fingerless mitts that I knit last fall when she was staying with us on Lopez. (I did recently knit a pair of gloves for Bill, but I don't have any pictures yet.) So, Catie it is!

Subscribe to:
Comments (Atom)